
When I was a kid, we ate Focaccia quite often. Whether this was homemade or bought from our local bakery, it was always a treat! As this is a kind of bread, you can eat this pretty much however you like it! Want to stuff it with some nice Salame? It works! How about some good smoked Scamorza cheese? Tasty! Do you prefer to top it with some garlic or eat it plain? Delicious anyway! Personally, my favorite is to stuff it with some fresh pistachio Mortadella! It’s a mouth-watering delicacy!
I asked my mom to teach me her recipe for her Focaccia dough when I moved out of the nest! Of course, this was an unwritten recipe, it’s how things often go when you have been used to cook a certain dish your entire life. We just did it together the first time and instructions were more like “it’s ready when it feels like this” rather than precise steps and measurements. To be honest, it worked just as fine for me for a long time, I made Focaccia almost every week for more than a decade now! Along the way, I started taking notes about quantities I used and I experimented a lot with water/flour ratios, leavening time, toppings, cooking temperature, thickness and so on. Finally, I have it written down and have been able to share it with others!
Focaccia makes for a great afternoon snack, but it also works great as a side to most foods that pair up well with bread. Sometimes, when I have friends or family over, I cut it in small pieces and serve it as an appetizer along with some cheeses or dips. It works all the time and it always disappears from the table!
Let’s get started now, shall we?
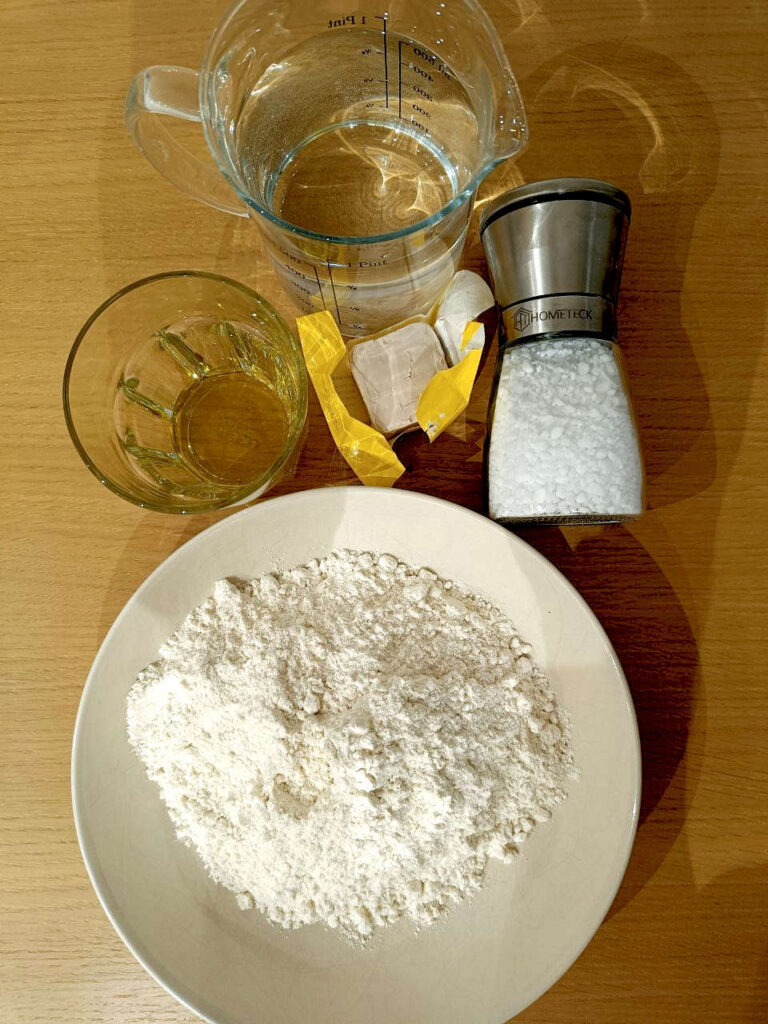
Ingredients
grams of flour
ml of warm Water (25-30C)
ml of Extra Virgin Olive Oil
grams of Salt
grams of fresh yeast
your toppings of choice
Ingredients
lb(s) of flour
tbsp of Extra Virgin Olive Oil
cups of warm Water (~80F)
tbsp of Salt
tbsp of fresh yeast
your toppings of choice
Ingredients
With its main ingredients being flour, water, salt, yeast and olive oil, Focaccia is quite a cheap recipe to make! Besides the base ingredients, you can choose to top it with it with anything you like! My personal favorite topping is a simple salt and rosemary, but sometimes I also like to use dried/cherry tomatoes, olives or garlic (like this time!).
I like to use fresh yeast, as opposed to the dried one. However, dried yeast works too just as fine! If you prefer to use that you should convert the amount of fresh yeast I indicated to the corresponding amount of dried yeast. Producers typically indicate the equivalence in the back of the package.
Did you know?
Humanity did not fully understand yeast and how it works until quite recently. We have, however, been using it since thousands of years ago! At the very beginning, we even believed it was magic! If you want to learn more about it, check this dedicated post!

I recommend choosing a wheat flour with a medium/high protein content (for example: bread flour or “Type 00“) for this, as it will greatly help your dough’s strength and contribute to getting an airy and soft Focaccia as a result.
Most of the time that goes into making Focaccia is spent waiting for the dough to rise, so you should choose the amount of yeast you will use based on when you are able to make the dough and when you will cook it! I often make the dough in the evening, so I can let it rise for at least 12 hours while I sleep and then bake it in the morning. On the contrary, whenever I want Focaccia to be ready in the afternoon or for dinner, I will make the dough in the morning. I included a leavening time selector in the ingredient list for convenience!
Step 1: Making the Focaccia dough
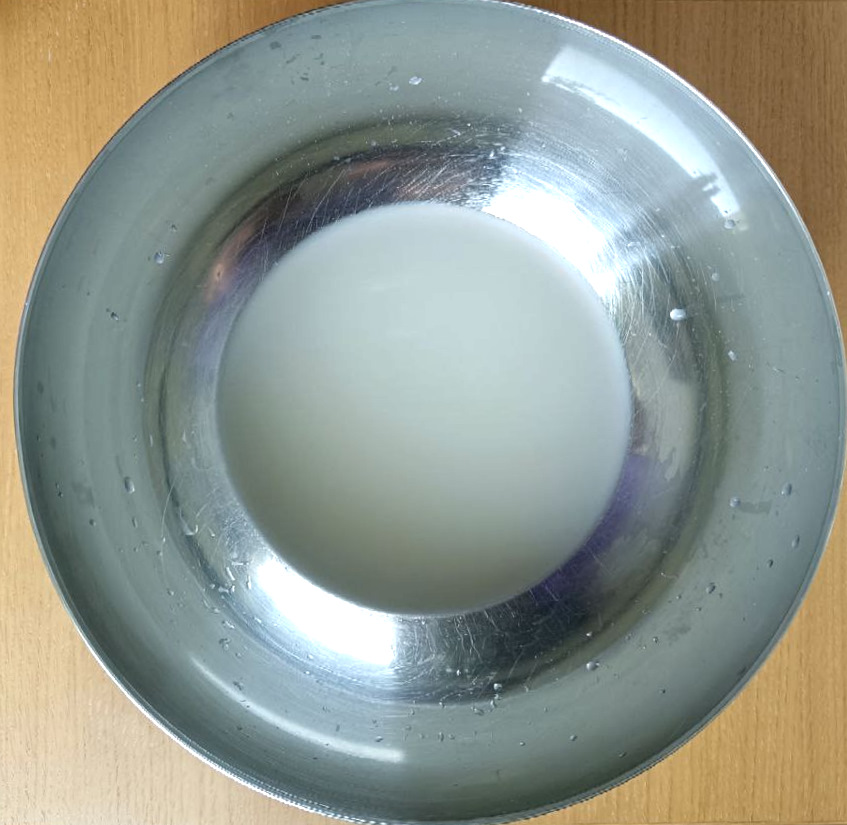
In a bowl, add about 2/3 of the water and the yeast. Mix it gently (with your hands or a fork) until the yeast dissolves in water. It will look like murky water at this point, but don’t worry, it’s how it’s supposed to look!
Now, add in most of the flour (just save a small amount for later) and mix until the water has been all absorbed. If at this point it looks too dry, don’t worry, this is intended and we will fix it soon. We are doing this so that we avoid adding the salt in the same water as the yeast. Salt effectively kills the yeast if it comes into direct contact with it, so much so that it can be called an inhibitor. By using this two-step process, we can have more control on its action and more reliable leavening times.
Mixing Technique!
You can choose to mix the dough using a fork or your hands. Either way, your movement should be one where you lift one side of the dough and fold it onto itself. It’s important to not apply too much force and not overstretch the dough, or it will become gummy and harder to work with.
You can add the salt to the water we left out earlier and mix until it’s all dissolved. Then, you can add the salty water, the remaining flour and the olive oil to the bowl and keep mixing until the dough becomes smooth and uniform in consistency. The dough should be sticky (it has a very high hydration level after all), but if it doesn’t hold together then it’s fine to add a little bit of extra flour to it. Different flours have different gluten and protein content, so small adjustments to the recipe may be required to attain the right consistency. You can use the image below as a reference!

Tip!
To avoid the dough from sticking a lot to the sides of the bowl, you can put a little bit of olive oil on a napkin and use it to oil the sides of the bowl. This will make the next steps easier and the bowl easier to clean later on!
You can now cover it with a kitchen cloth or a towel and let it rest. Ideally, put it in a place where it’s protected from cold air streams, like in a cabinet.
(Optional) Step 2: Stretch and folds
This is an optional step, but doing this can contribute a lot to strengthening gluten bonds in your dough. This will make it able to retain air bubbles better, allowing it to rise more and making your Focaccia more airy and soft.
How to perform a Stretch and Fold
To perform a stretch and fold, you can:
- Fill a small bowl with water and wet your fingers. This will prevent the dough from sticking to your hands;
- Lift the dough from one side and gently fold it onto itself;
- Repeat for different sides of the dough, up to 4-8 folds in total.
After 30 minutes since you set the dough to rest, you can perform the first set of stretch and folds. As you do the folds, you will notice that your dough will start feeling harder to the touch. This is normal, it will soften up again as we let it rest. On the flip side, your dough will also look pleasantly smoother after some stretch and folds.
Repeat this process every 30 minutes for 1 to 2 hours (up to 4 sets of stretch and folds in total). After this is done, just let your dough rest until the end of the first rise. The time it takes will depend on the amount of yeast you have used. If you used the leavening time selector above, you can refer to that, otherwise you can keep an eye on the dough and consider the first rise done when the dough has more than doubled in size.

Upon completing its first rise, your dough will look like in the picture below:

Step 3: Second rise
After the first rise of your dough is done, take the oven tray you intend to cook it on and add a layer of olive oil in the bottom. If you want a thick Focaccia, you can use a smaller tray with tall edges, while for a thinner bread you can use a large tray. This time, I chose to make a thicker Focaccia! Gently take the dough out of the bowl and put it on the tray. Cover the dough with a kitchen cloth or another tray placed on it upside down and let it rest for another 45-60 minutes. This will allow the dough to perform its second rise, increasing in volume and developing more air bubbles.


Step 4: Topping and baking the Focaccia
Toppings

Start preheating the oven to a temperature of 250C (482F). The oven should be static, not ventilated. If your oven doesn’t reach this temperature, 200C/220C (392F/428F) will also work fine, we’ll just add a few minutes the cooking time! While the oven heats up, lay some olive oil and add some salt (any amount that you like) on top of the Focaccia. If you add other toppings now, they will likely roast in the oven while baking. It’s fine if it’s what you want, but otherwise you can always add them mid-cooking! This time, I went for some garlic and rosemary. I think roasted garlic has its own charm, so I added it immediately. Gently dimple the dough with your fingers to create small pockets for the oil and other toppings to reach, and we’re good to go!
Baking
Place the tray in the middle of the oven. Baking should take 20-25 minutes in total, but keep an eye on it throughout the process, as this can change with different ovens. When the top of the Focaccia has gained color, you can move it to the bottom of the oven. If you opted for adding toppings mid-baking, now is also the perfect time to take it out of the oven for a moment to add them.

Let it finish baking until it has cooked uniformly on the inside. You can try poking it with a toothpick or a knife to see if there is any raw dough on the inside if you are undecided.
Once it’s out of the oven, congratulations, you’re done! Serve it warm and enjoy!


Leave a Reply